
Like everyone else in the universe, I was smitten by Angry Chicken's cool little elf shirt. I followed her links for the instructions at Craftster - and thought that I might try my hand at it someday.
Then Michael's put t-shirts on sale this week for $2.50 each, and I figured that this was a sign that I needed to try it now!
But first...what to do???
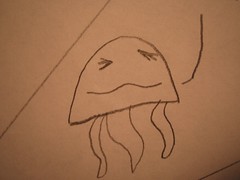
Schecky has been taking a class on Saturdays called "How to Draw Your Own Comics".* And he's been cranking out lots of product, a great deal of which I am just smitten by! Admittedly, I am biased...
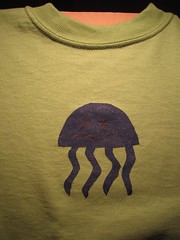
So I selected one of the more simple drawings - this little cranky jellyfish guy- just in case this project proved to be more difficult than advertised....
Pleasantly enough, it was all pretty straightforward...
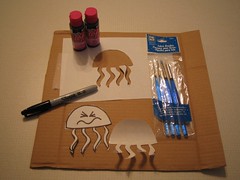
I reproduced his drawing by just redrawing it on the freezer paper's rough side (so it's not an exact copy of his) and then I cut it out with an X-acto knife. However, if I were to do it over again, I would use a copier and copy his exactly. I was just too lazy and too eager to start to take the time to take this and copy it. Also, you can supposedly use freezer paper in your printer.
Then I ironed the freezer paper to the shirt, and then applied the fabric paint. Voila!
Things I did that were good:
The big thing is that, like Angry Chicken, I ironed a second piece of freezer paper on the inside of the shirt to help stabilize it all. Also, I did a careful thin coat of paint, then let it dry and did a second - I think that this really helped prevent "bleeding" of the ink.
Things I did that I would do differently next time:
After searching through the Craftster archives for additional information about this project, I decided to apply a layer of packing tape over the freezer paper before cutting it out. The idea behind this was to make a more sturdy stencil, and provide for more precise cutting. It did add sturdiness, but when I went to iron it on, I found that it made it more bulky and it wanted to buckle and wrinkle. Plus, I had to use a pressing cloth so the packing tape did not melt - and this made it more difficult to iron the freezer paper on. I would not bother with this step again.
Additionally, I think I would just use regular scissors to cut out most of the design - I would have had more control over curves etc. than I had with the X-acto.
In short - I don't think this is perfect, but I can live with it. Particularly given how quickly I whipped it out! Schecky, on the other hand, thinks it's wonderful and has already stated that he's wearing it to school tomorrow....
*No, the apple doesn't fall far from the tree. Bubba is so proud he could burst!

4 comments:
I know this is definately something I want to try soon!
I love this! I love the shirt and the helpful tips you shared. Great artwork Schecky!
Cute jellyfish! FWIW, you can also just trace over the drawing with the freezer paper. That's what I did with my little guy's robot drawing- I just put the FP over the original drawing, taped them both up to a window (for backlighting) and traced. Worked great.
Thanks for visiting my blog!
That looks great! So glad someone else is trying this. I have everything I need but the shirt b/c I'm looking for 100% cotton. Can't wait to try it!
Post a Comment